How to Restore a locked up Seagate Dockstar
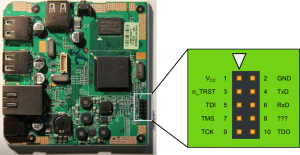
Recently I wanted to try my LCD extension for the Seagate Dockstar with the actual hardware, but had to realize that my unit was broken. A quick test with a serial cable revealed that the bootloader was not starting. For embedded systems that's usually the worst case scenario. The only chance left to restore the device is to reprogram the internal flash memory using a JTAG debug connection. Luckily Seagate went so far to include a 2mm-pitch male connector on the mainboard with all JTAG pins brought out. I still had an adapter cable for the 2mm pitch connector lying around from the last Dockstar rescue, so I could easily connect to the system. Bus Pirate to the rescue!
As I started with a vanilla Ubuntu 9.04 Karmic Koala system in respect to JTAG tools, I will describe all steps necessary from the first download to the working system.
The necessary tools for the process can be bought from Seeedstudio. I used the Bus Pirate (v2go) and a Seeeduino (v1.1). Newer models should work as well. DO NOT USE A REGULAR ARDUINO FOR THIS PROCEDURE, AS IT WILL KILL YOUR DOCKSTAR! THE SUPPLY VOLTAGE OF THE SEEEDUINO CAN BE SELECTED AND HAS TO BE SET TO 3,3V!
DISCLAIMER: I can not be hold liable for any damages, data loss or other problems being caused by the steps outlined in the following document. I do not guarantee for the correctness of the offered description - so you have to think for yourself and check everything twice. If you're at the point where you need to reflash your device you already have come to terms with it being broken. The following steps might work for you or leave you with a nice paper weight. This tutorial is for the experienced user only. Don't proceed if you're not absolutely sure what you're doing!
Step 1: Checkout and compile OpenOCD
To actually talk the processor via JTAG one needs a special software. The open-source offering for this cause is OpenOCD. My Ubuntu system is pretty old, so the a OpenOCD version including Bus Pirate support was not in the repository. To compile OpenOCD we first need to install some necessary tools. In a terminal type
sudo apt-get install git-core libtool texinfo automake checkinstall
GIT is needed to checkout the latest version of OpenOCD; libtool, texinfo and automake are necessary for OpenOCD to compile; checkinstall creates a package after a successful make, which makes it easier to remove the program afterwards.
First of, cd to a directory of your choice and type
git clone git://openocd.git.sourceforge.net/gitroot/openocd/openocd
Now you have a local copy of the latest OpenOCD sources. To compile and install OpenOCD type
cd openocd
./bootstrap
./configure --enable-buspirate --enable-maintainer-mode
make
sudo checkinstall
After a successful checkinstall the command openocd should be available.
Step 2: Download required files
You will need four files to bring your Dockstar back to life:
- a config file for OpenOCD
- an image of the uboot bootloader
- an image of the Linux kernel and a matching ram-disk
- a firmware for the BusPirate supporting OpenOCD.
As I couldn't find the original image files for the Dockstar, I used the modified uboot bootloader and rescue system image compiled by Jeff Doozan. To ease the installation I packed all necessary files in an archive that can be downloaded here. You can always download those files yourself:
mkdir dockstar
cd dockstar
wget http://plume.redox.ws/data/documents/dockstar.cfg
wget http://jeff.doozan.com/debian/uboot/files/uboot/uboot.mtd0.dockstar.jeff-2010-10-23.kwb
wget http://jeff.doozan.com/debian/rescue/uImage-mtd1.img
wget http://jeff.doozan.com/debian/rescue/rootfs-mtd2.img
wget http://dangerousprototypes.com/forum/download/file.php?id=3493
Step 3: Set-up your TFTP server
To complete the restoration process you need a TFTP server in your network. You can find several tutorials for Ubuntu on the net (e.g. http://blog.tuxcoder.com/2008/06/configure-tftp-server-in-ubuntu.html). The server has to be able to find the following files:
- uImage-mtd1.img
- rootfs-mtd2.img
Of course the server has to be in the same network as the Dockstar.
Step 4: Update and configure the BusPirate
Unfortunately the BusPirate firmware capable of talking to OpenOCD can't be flashed using a Linux system (as far as I know). I tried it but it did not work with the supplied update tool. The ds30 Loader GUI for Windows works fine. You can find more on the BusPirate update procedure in the Dangerous Prototypes Wiki. After you updated the BusPirate try to connect to it via OpenOCD. First you have to alter the config file to use the BusPirate as interface:
Replace
# I'm using a wiggler compatible cable
source [find interface/buspirate.cfg]
source [find target/feroceon.cfg]
jtag_khz 500
jtag_nsrst_delay 500
With
interface buspirate
buspirate_port /dev/ttyUSB0
buspirate_speed fast
buspirate_vreg 0
buspirate_pullup 0
This configuration worked for me. Now try:
openocd -f ./dockstar.cfg
If OpenOCD sucessfully talks to the BusPirate this step is completed.
Step 5: Connect the Bus Pirate and Seeeduino
Before the Seeeduino gets connected to anything you have to make sure the on-board microcontroller does not interfere with the communication between the Dockstar and your PC. The easiest way to achieve this, is a simple program that configures the serial ports on the controller as inputs. Inputs operate in an high-impedance state and do not affect the serial connection. The listed program will do the job:
void setup()
{
    pinMode(0, INPUT);
    pinMode(1, INPUT);
}

void loop()
{
    delay(1000);
}
So connect the Seeeduino to the PC and upload the program. Disconnect it again and you are ready to go on.
| Dockstar | Bus Pirate | Seeeduino |
|---|---|---|
| 1 Vcc | -- | -- |
| 2 GND | GND | GND |
| 3 n_TRST | AUX | -- |
| 4 TxD | -- | TX |
| 5 TDI | MOSI | -- |
| 6 RxD | -- | RX |
| 7 TMS | CS | -- |
| 8 ??? | -- | -- |
| 9 TCK | CLK | -- |
| 10 TDO | MISO | -- |
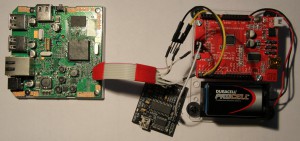
You will need some kind of adapter for the 2mm-pitch male connector on the Dockstar board. I made one myself using a female connector and some cable. Follow the connection table thoroughly, it might save your device later on. However, while connecting the three devices do not connect any of them to a PC or power.
Now, first of all, power up the Dockstar. As its supposedly broken not much will happen now. When the Dockstar is running you can connect the Bus Pirate and Seeeduino to your PC. Execute lsusb in a terminal to check if both devices have successfully been connected. To talk to the Dockstar via the Seeeduino you will have to open a terminal program. I used screen:
screen /dev/ttyUSB1 115200
The actual device file created for the Seeeduino depends on your configuration and order of connection. To make sure you opened the right device connect the leads for RX and TX together and check for an echo in the terminal.
Step 6: Flash the bootloader
Now you're ready to restore the Dockstar. Open three terminals. In the first one start OpenOCD with the command given under step 4, in the second open a serial connection to the Seeeduino (see step 5) and in the third type:
telnet localhost 4444
Now you're connected to the OpenOCD console. The following commands let the CPU on the Dockstar enter the debug mode and flash the bootloader:
init
# first type in the "halt" command WITHOUT pressing ENTER
halt
# now press the reset key on the Dockstar, hold it and press ENTER the same moment you release it
# you should now read something like "target state: halted"
dockstar_init
load_image uboot.mtd0.dockstar.jeff-2010-10-23.kwb 0x800000
# of course you can rename the image to a shorter filename
# when the image has been loaded successfully continue
resume 0×800200
Now should switch to the serial connection IMMEDIATELY. You should see the bootprompt output of uBoot. Disrupt the boot process by pressing a key. DO NOT press reset as of now, as the bootloader is executed from RAM and will be lost after a reset. In the uBoot prompt type:
nand erase
nand write.e 0×800000 0×0 0×80000
Now you're half way through. If everything worked out well you can disconnect the BusPirate and press reset. You should again see the boot prompt on the serial connection. The bootloader does not find a kernel image therefore will be stuck in a loop. Jeff Doozan's modified bootloader is capable of booting of an USB stick. If you happen to have one, try it.
Step 7: Flash the rescue system
This step is not really necessary but I found it extremly helpful. Disrupt the boot sequence at startup and enter the following commands:
setenv ipaddr xxx.xxx.xxx.xxx
# has to be in your network and unused
setenv serverip xxx.xxx.xxx.xxx
# ip address of your TFTP server
setenv ethaddr xx:xx:xx:xx:xx:xx
# MAC address, written on the bottom of the case
saveenv
ping $(serverip)
# checks the connection to the server
Now we will flash Jeff Doozan's great rescue Linux to the device. With it the Dockstar can be booted without an USB stick. Enter the following commands:
nand erase 0x100000 0x400000
tftp 0x800000 uImage-mtd1.img
nand write.e 0x800000 0x100000 0x380000
tftp 0x1000000 rootfs-mtd2.img
The images are now flashed, but uBoot will ignore them if we don't change its configuration:
setenv rescue_set_bootargs 'setenv bootargs console=$console ubi.mtd=2 root=ubi0:rootfs ro rootfstype=ubifs $mtdparts $rescue_custom_params'
setenv rescue_bootcmd 'if test $rescue_installed -eq 1; then run rescue_set_bootargs; nand read.e 0x800000 0x100000 0x400000; bootm 0x800000; else run pogo_bootcmd; fi'
setenv bootcmd 'run bootcmd_usb; usb stop; run rescue_bootcmd; reset'
saveenv
run rescue_bootcmd
The Dockstar should now be booting the rescue system. When no USB stick with a working Linux system is connected to the Dockstar it will now try to boot the rescue system. So whatever happens, you will still have a working system on your device.
NOTICE: somehow the Linux kernel would not start as long as the Bus Pirate was still connected to the device.
Sources
- http://www.yourwarrantyisvoid.com/2010/09/08/dead-dockstar-resurrected-with-jtag/
- http://jeff.doozan.com/debian/
- http://forum.doozan.com/read.php?3,3826,3826#msg-3826
- http://wiki.ubuntuusers.de/PXE-Installation
- http://plume.redox.ws/article13/dockstar-debricking-jtag-with-buspirate
- http://blog.hodgepig.org/2010/04/13/545/
- http://forum.doozan.com/read.php?2,1169,1361#msg-1361

